Friday, March 30, 2012

Oatmeal Chocolate Chunk Cookies


These cookies make me picture little kids eating them with a cold glass of milk after school. They just seem like that kind of cookie. Or for adults, a cookie you eat on a cold winter day with hot chocolate or coffee. I don’t know why, but that’s what I picture.

I usually prefer to make simple recipes just because I have a tendency to mess up complicated recipes. When I read this recipe, it seemed a little complicated but I decided to try it as a challenge for myself. The one part I had never done before was browning the butter. You have to cook a stick of butter in a saucepan and let the bottom get brown. I wasn’t sure if I would do this right, but it actually worked out just fine. The butter cooked like it should and all went well. After I actually made it though, it really wasn’t that complicated. Don’t let all the words freak you out but do take note of the helpful tips!

This recipe doesn’t make very many cookies – it says it makes 15-18 but it only made 12 for me (perhaps because I snuck a little dough). So if you want to make these for a larger group, plan ahead or double the recipe accordingly.

The people I shared these with all enjoyed them, just sayin’ =)

Ready… set… go!

Heat a small saucepan over medium-low heat and add butter. Whisking constantly, cook butter until bubbly and until small brown bits appear on the bottom of the pan – about 5-6 minutes. Watch closely and immediately remove the butter from the heat, whisking for an additional 30 seconds or so. Set aside and let cool COMPLETELY. Note: It does not need to solidify at all, but it should not be warm to the touch.

In a bowl, combine flour, salt, baking powder, oats and cinnamon, mixing, then set aside.

Once butter has cooled, add to a large bowl. Whisk in sugars, stirring until smooth. Add in egg and vanilla, whisking until smooth once again.

Slowly begin to stir in dry ingredients, using your hands if necessary to bring dough together. If you find that the dough still won’t come together, add in milk 1 tablespoon at a time. Fold in chocolate chunks, distributing them evenly. Refrigerate dough for 30 minutes.

Preheat oven to 375 degrees F. Using an ice cream scoop or your hands, form dough into 1 1/2 inch balls.

Place about 2 inches apart on a nonstick baking sheet, then bake for 10-12 minutes, or until bottoms and edges are golden. Let cool before serving.


Ingredients:
makes about 15-18 cookies
1/2 cup unsalted butter
1/2 cup granulated sugar
1/2 cup loosely packed brown sugar
1 large egg
2 teaspoons vanilla extract
1 1/4 cup all-purpose flour
3/4 cups rolled oats
1/4 teaspoon salt
1/2 teaspoon baking powder
1 1/2 teaspoons cinnamon
1 cup chocolate chunks
optional: 1- 2 tablespoons milk, if dough is crumbly

Heat a small saucepan over medium-low heat and add butter. Whisking constantly, cook butter until bubbly and until small brown bits appear on the bottom of the pan – about 5-6 minutes. Watch closely and immediately remove the butter from the heat, whisking for an additional 30 seconds or so. Set aside and let cool COMPLETELY. Note: It does not need to solidify at all, but it should not be warm to the touch.

In a bowl, combine flour, salt, baking powder, oats and cinnamon, mixing, then set aside.
Once butter has cooled, add to a large bowl. Whisk in sugars, stirring until smooth. Add in egg and vanilla, whisking until smooth once again. Slowly begin to stir in dry ingredients, using your hands if necessary to bring dough together. If you find that the dough still won’t come together, add in milk 1 tablespoon at a time. Fold in chocolate chunks, distributing them evenly. Refrigerate dough for 30 minutes.

Preheat oven to 375 degrees F. Using an ice cream scoop or your hands, form dough into 1 1/2 inch balls. Place about 2 inches apart on a nonstick baking sheet, then bake for 10-12 minutes, or until bottoms and edges are golden. Let cool before serving.

Chow.

Saturday, March 24, 2012

Chocolate Chip Cookie in a Mug

I decided that this week I would make a super easy recipe. It’s a chocolate chip cookie in a mug. That blows my mind. You make it in the microwave and it tastes just like a cookie. If you ever need a sweet treat but you just can’t find anything good to eat, this is a super easy recipe to make your own single serve cookie. It takes all the same ingredients as making a whole batch of chocolate chip cookies, so it seems like a lot of ingredients but it really doesn’t take much time at all. It only took me about 5 minutes to make, start to finish. And it was really good! I wasn’t sure if it would turn out very well, but it actually tasted really yummy – like a cookie fresh out of the oven. Why haven’t I made this before?!

Start by melting your butter in the microwave. Add sugar, brown sugar, vanilla and salt. Stir to combine.

Separate your egg and add the yolk to your cup. Stir to combine.


Add flour (I gradually added mine, just like a full cookie recipe says) then stir again. Add the chocolate chips, and give a final stir.


Cook in microwave 40-60 seconds, start checking for doneness at 40 seconds. (mine took 50 seconds)

Eat the mind blowing cookie with a spoon!


Recipe:

1 Tablespoon Butter
1 Tablespoon Granulated White Sugar
1 Tablespoon of firmly packed Dark Brown Sugar
3 Drops of Vanilla Extract
Small Pinch of Kosher Salt
1 Egg Yolk (discard the egg white)
Scant 1/4 of All Purpose Flour
2 Tablespoons of Semi Sweet Chocolate Chips

Start by melting your butter in the microwave. Add sugar, brown sugar, vanilla and salt. Stir to combine. Separate your egg and add the yolk to your cup. Stir to combine. Add flour, then stir again. Add the chocolate chips, and give a final stir. Cook in microwave 40-60 seconds, start checking for doneness at 40 seconds.

Devour!

(Mr. Berish, try this!)

Friday, March 16, 2012

Cake Balls


I’ve seen these sold on sticks at Starbucks (way overpriced) and decided to look into making them myself. All the recipes were the same, just varying in cake, frosting, and chocolate type. I chose to make mine with Funfetti cake, vanilla frosting, and white chocolate. The combinations you can chose are endless, which is why I am such a fan of these! Cake has become so versatile, like in my earlier post where I made Funfetti cookies. For cake balls (or pops, if you decide to put them on a stick) just choose the combination of cake, frosting, and chocolate that you’d like! I brought a container of them to school and shared them with friends, classmates, and teachers. The common response? YUM. Now get baking!

Prepare the cake mix of your choice according to package directions using any of the recommended pan sizes. (I stole a piece.. hehe)

When the cake is done, crumble while warm into a large bowl, and stir in the frosting until well blended (the recipe says ¾ container of frosting, but add small amounts of frosting until desired moistness is obtained. I didn’t use the whole cake so mine took less than ¾ of the container).

Melt chocolate coating in a glass bowl in the microwave, or in a metal bowl over a pan of simmering water, stirring occasionally until smooth. (DON’T BURN THE CHOCOLATE. I’ve had bad experiences with that. Burnt chocolate is gross…)

Use a melon baller or small scoop to form balls of the chocolate cake mixture. Dip the balls in chocolate using a toothpick or fork to hold/roll them. Place on waxed paper to set.

You can decorate them with sprinkles (before the chocolate hardens) or use food coloring in white chocolate and drizzle colored chocolate over them.
This is a fun recipe to make and it lets you be creative! It's also a good kid-friendly recipe.

Recipe:

Ingredients
1 (18.25 ounce) package cake mix
3/4 container prepared frosting
1 bar chocolate flavored confectioners coating or 1 bag of chocolate chips

Directions
1.    Prepare the cake mix according to package directions using any of the recommended pan sizes. When cake is done, crumble while warm into a large bowl, and stir in the frosting until well blended.
2.    Melt chocolate coating in a glass bowl in the microwave, or in a metal bowl over a pan of simmering water, stirring occasionally until smooth.
3.    Use a melon baller or small scoop to form balls of the chocolate cake mixture. Dip the balls in chocolate using a toothpick or fork to hold them. Place on waxed paper to set.

Enjoy =)

Friday, March 9, 2012

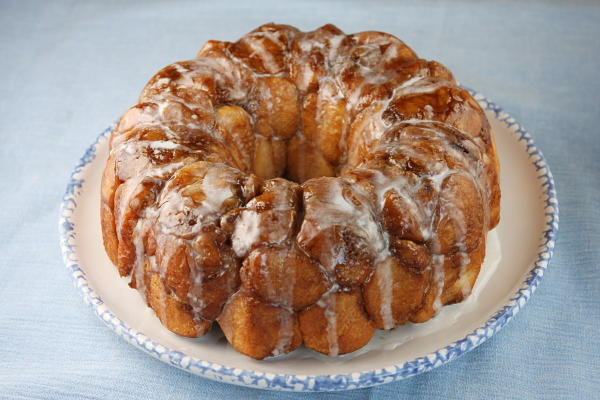
Monkey Bread

(from online)

Alright. Well, I had a little bit of trouble with this recipe. It’s not a difficult recipe, I just didn’t read it close enough....
Here’s the recipe and then I’ll tell you what I did instead:

Monkey Bread
Ingredients:
4 cans refrigerated biscuits
¾ cup packed brown sugar
½ cup butter
¾ cup white sugar
2 teaspoons cinnamon
Optional - ½ cup raisins

Directions:
1.       Preheat oven to 350 degrees and grease a 9-10 inch tube pan.
2.       Mix white sugar and cinnamon in a medium sized plastic bag. Cut the biscuits into quarters and place six to eight biscut pieces in the sugar/cinnamon mix. Shake well.
3.       Arrange pieces in the bottom of the greased pan. Continue layering until all the biscuit pieces are coated and in the pan. If you are using raisins, place them among the biscuit pieces as you are layering.
4.       In a small saucepan, melt the butter with the brown sugar over medium heat. Boil for 1 minute. Pour over the layered biscuits.
5.       Bake for 35 minutes. Let bread cool in pan for 10 minutes, then turn onto a plate. Pull apart and enjoy!

Well, you see, I read the part about mixing the sugar and cinnamon together as sugar and brown sugar. I don’t know why, but I thought that seemed right, so that’s what I did. I coated the biscuit pieces with a sugar/brown sugar mix. Then when I realized I had to boil the butter and brown sugar I was confused because I already used the brown sugar. Whoops.

Well after some thought, I decided to just keep going because I couldn’t change anything now anyway. So I melted the butter and brown sugar (another ¾ cup) as it told me to. I sprinkled some cinnamon on top of my layered biscuit pieces and then poured the butter/brown sugar over the top. I wasn’t sure if it was going to turn out because I did it completely wrong, but it actually turned out alright! I don’t know how well it compared to the actual thing because the last time I had monkey bread (made the right way) was when I slept over at Amber's house when we were like 10 and her mom made it for breakfast. I definately think hers was better than mine! But hey, my dad and my parents’ two friends that were over ate it and said it was good! Hopefully they weren’t just saying that to make me feel better… haha but they did eat almost a whole pan (I made two pans out of this recipe), so I assume they truly did like it. But I’m just glad it turned out decently =) Lesson learned: Always read the recipe carefully!

Preheat oven to 350 degrees and grease a 9-10 inch tube pan (I used 2 round pans and put a glass cup in the middle as a make shift tube pan). Mix white sugar and CINNAMON in a medium sized plastic bag. Cut the biscuits into quarters and place six to eight biscut pieces in the sugar/cinnamon mix. Shake well.


Arrange pieces in the bottom of the greased pan(s). Continue layering until all the biscuit pieces are coated and in the pan. If you are using raisins, place them among the biscuit pieces as you are layering.

In a small saucepan, melt the butter with the BROWN SUGAR over medium heat. Boil for 1 minute. Pour over the layered biscuits. Bake for 35 minutes (I put a baking sheet on the bottom shelft to catch any drippings).

Let bread cool in pan for 10 minutes, then turn onto a plate (or just scoop pieces out of the pan). Pull apart and enjoy!

Next time I make this, I'll make sure I follow the directions more carefully!

Friday, March 2, 2012

Williamsburg Bread

I’ve been eating Williamsburg Bread for as long as I can remember. I think we might have gotten the recipe from my grandma. I’m not sure why it’s called Williamsburg Bread…maybe it was created in Williamsburg, Virginia? But why would anyone name it that? I wouldn’t name a recipe that I created Milwaukee Cookies or Waukesha Cupcakes or something like that. Weird.

This recipe has often been what my family has made on Christmas morning as Jesus’s “birthday cake”. It's been a tradition in my house. Williamsburg bread is about the closest thing you can get to cake that isn’t too sweet for breakfast. It’s also super easy with simple ingredients, yet it comes out tasting delicious. My friend Sara liked it so much when I made it once that when her cousin died, I brought some to her house for her family. It’s that kind of dessert. Not too sweet, but still comforting.

Spread 1 package of crescent rolls on bottom of greased 9 x 13 inch pan. Mix cream cheese (make sure it is room temperature or microwave it to soften it otherwise your mix will be lumpy), 1 cup sugar, egg yolk and vanilla in a bowl and spread over the layer of crescent rolls.

Put second package of crescent rolls on top.

Brush with egg white and sprinkle sugar and cinnamon topping on top.

Bake at 350 degrees for 30-35 minutes.


It gets a nice flaky top with a creamy inside.
See! Super simple. Now try it and see how delicious it is. =)

Williamsburg Bread

Ingredients:
2 pkg. crescent rolls
2 (8 oz.) pkg. cream cheese
1 c. sugar
1 egg yolks (reserve white)
1 tsp. vanilla
Topping:
1/2 c. sugar
2 tsp. cinnamon

Spread 1 package of crescent rolls on bottom of greased 9 x 13 inch pan. Mix cream cheese, 1 cup sugar, egg yolk and vanilla; spread over layer of crescent rolls. Put second package of crescent rolls on top. Brush with egg white and sprinkle sugar and cinnamon topping on top. Bake at 350 degrees for 30-35 minutes. Keep leftovers refrigerated. Enjoy warm (easy to microwave) or cold.

I brought this to my sister dorm when I visited her and ate it for breakfast in the morning with my friend Meghan. A brilliant new idea for breakfast. YUM!